

|
Home
|


| IFFSnooper ... |


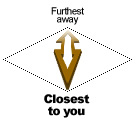
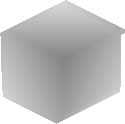
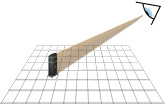
| The z-buffer controls the 'modelling' of an object in the game, ie. determining which part of the object is closer to you, the viewer, and which part is further away. You look down on a Sims' world from a constant angle of about 30°. |
|
Making a New |

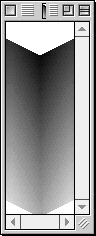
| The darkest area in the z-buffer belonging to this fridge is where the top arrow is pointing. It is also that part of the fridge 'closest' to you, the viewer. |
| This foot is the lightest grey — the furthest away from you. |
| Jump to the beginning |
| The lighter the grey, the further away it is. The darker the grey, the closer to you. |
| There is a very good set of z-buffer templates, made by Bil Simser of Blueprint fame, available from
Miffy's site, Architectural Supplies for Sims. Go there now and download them from the z-buffer tutorial which can be found on the School of Transmogrification pages. While you're there, carefully read the tutorial. ;-) |
|
Now you can make the z-buffer for your new object. |
| The top surface of a table or a counter follows the same rules. |
|
Save the z-buffer using a Custom palette in Indexed Colour.
|
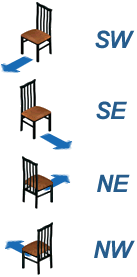
| Create the rear view of your object and its associated a-channel and z-buffer. |
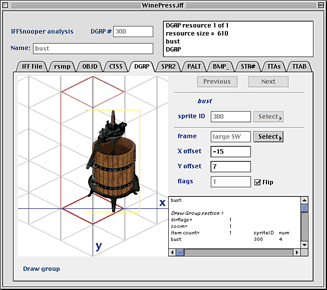
| Open your new object in IFFSnooper and click on the DGRP tab. The object will need to positioned properly on the red tile by entering new x and y co-ordinates. After you enter a number, press TAB or click in another box to see the updated position of the object. |
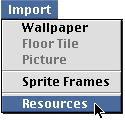
| Import the sprite frames and resources into IFFSnooper and save your new object. |
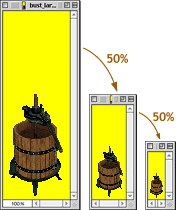
| Scaling the p-sprite down means you will have to fix up the anti-aliased edges again.* Put the medium
and small p-sprites into RGB Colour before pasting the scaled image. Although the a-channels and z-buffers are already in Indexed Colour, each medium and small zoom still needs to be saved with its own Custom palette. * Re-doing the anti-aliased edges again for the medium and small zooms can be very tedious. You might play round with scaling the large zoom in Indexed Colour first so the jagged edges are maintained, then doing it again in RGB Colour (to get a smoother anti-aliased image) and pasting it on top — selecting bottom layer's background and clearing the top layer's fuzzy bits — merge down ... or something like that ... maybe it's easier to re-do the edges manually! |
|
The x-y co-ordinates have to be set in each direction and in each zoom.
|


| Go to the CTSS tab and put in a new name and description. Clone if necessary and go to the OBJD tab and enter your Magic Cookie and change the price ... ... and that's it!! |
| IFFSnooper's Views |
| A printable New Object Quick Reference sheet is here. (The page will open in a new window.) |
| Don't get confused: If you also have access to the PC Transmogrifier, be aware that an object's views are displayed differently: |
|
|
IFFSnooper |
TMog |
| All the large zoom files have to be scaled down for the medium and small sprites. |